


Can't find what you are looking for?
We are here for you!

Heeft u problemen met uw digitale display, voer dan de volgende stappen uit om het display te resetten.
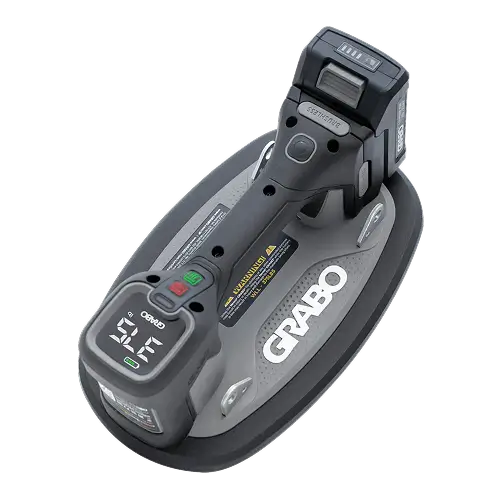
Press the on/off power switch to turn on the GRABO® PRO Brushless. The digital display will show 0. Optionally, press the measurement unit selector to change units from bar to psi and from kg to lbs.
Position the GRABO® PRO Brushless firmly against the surface of the object you want to lift.
Press the motor power button to activate the vacuum pump. Four green lights on the digital display will illuminate in sequence as pressure increases to the maximum level. The pump will automatically stop when the pre-selected value is reached.
The vacuum pump will automatically reactivate to restore vacuum pressure if it falls below the pre-selected value. The pump will run continuously if the material is too porous to achieve the required vacuum pressure.
When done, press the motor power button to stop the pump, then press the vacuum release button to release the object.
No light: The GRABO® PRO Brushless is turned off.
Flashing red (once per second): The GRABO® PRO Brushless is turned on.
Flashing red (three times per second): The pump power button is activated, but the vacuum value is below the set restart value.
Continuously green: The motor power button is activated and the vacuum value is at or above the set restart value.
Screen flashes three times: The pump is running and the ON/OFF switch was unintentionally turned off.
4 green bars on battery indicator: Battery is sufficiently charged.
Last bar of battery indicator flashes red: Battery capacity is low or empty. Recharge before continuing.
The GRABO® PRO Brushless allows you to set a vacuum threshold between -0.30 bar and -0.80 bar. The pump will automatically stop once the threshold is reached. Ensure the air pressure is at zero before entering the settings.
Enter Settings: Press and hold the measurement unit selector for 3 seconds until the "SET" icon flashes on the display. Then press and hold the vacuum release button for 2 seconds until the "SET" icon stops flashing.
Adjust Settings: Press the unit selector to select the desired pressure value. The pressure can be adjusted in increments of 0.05 bar, within a range of -0.30 to -0.80 bar.
Exit Settings: The device automatically exits settings mode after 6 seconds of inactivity.
To pair with a remote control
Enter Pairing Mode: Press and hold the measurement unit selector for 3 seconds. The display will flash a "SET" icon. Then press and hold the vacuum release button for 2 seconds until the "SET" icon stops flashing. Ensure the air pressure is zero before starting.
Start Pairing: Simultaneously press both the "pump on" and "pump off" buttons on the remote control. A beep will sound once pairing is successful. If no buttons are pressed for 6 seconds, the device will automatically exit pairing mode.
To unpair the remote control
Simultaneously press and hold the "Pump Off" and "Release" buttons on the remote control.
Within 6 seconds of releasing those buttons, press and hold both the "Pump On" and "Release" buttons together to finalize the unpairing process. Two beeps will sound once unpairing is successful.
Warning: When the low battery chime sounds and the digital display flashes, immediately set down and secure the load being carried. Failure to do so may result in the lifter releasing the load, which could cause serious personal injury and damage to the material being lifted.
To remove the worn rubber foam seal, insert the hook into the buckle hole on the seal and gently pull.
Gently press a replacement rubber foam seal into position.
Make sure that the replacement rubber foam seal fits correctly and securely.
Clean the air filter when dirty. The filter needs to be replaced when badly worn or ripped. When lifting clean material, the filter lasts longer than when used on dirty or dusty materials.
Turn the GRABO® PRO Brushless upside down.
Use the tip of a screwdriver to remove the air filter lock ring and the air filter pad.
Either clean the filter with compressed air, or insert a replacement air filter pad.
Insert the air filter lock ring to secure the filter in place.
Slide the battery latch to unlock the battery.
Remove the battery.
Connect the battery with the battery charger to a wall socket.
When the battery is fully charged, the LED on the charger turns green.
Disconnect the battery charger from the wall socket and the battery.
Insert the battery back into the battery compartment on the tool.
Ensure the battery is securely installed.
We are here for you!